In today's fast-paced content ecosystem, video is no longer a luxury for publishers; it is the core of audience engagement and revenue growth. Yet, the gap between mediocre and magnetic video content is vast, determined by a handful of critical techniques. This guide moves beyond the basics, offering a comprehensive roundup of professional video production best practices that cover the entire lifecycle, from meticulous pre-production planning to masterful post-production execution.
Whether you're a seasoned publisher or just beginning to scale your video strategy, these nine actionable principles provide the framework to produce consistently high-quality, impactful content. You will learn the specific, practical steps required to elevate every project, covering essential areas like visual composition, professional audio management, and strategic storytelling. Mastering these elements is the key to creating videos that not only capture attention but also retain it.
For publishers looking to automate and scale this process without sacrificing quality, platforms like Aeon are transforming the game. By translating existing text, audio, or video assets into polished, on-brand videos with minimal effort, Aeon embodies these best practices, making professional-grade video creation more accessible than ever. This guide will explore the techniques that set your content apart and ensure every video you produce meets a high standard of excellence, driving meaningful results for your business. Let's explore the techniques that will set your content apart.
1. Thorough Pre-Production Planning
The single most impactful phase of any video project happens before the camera even starts rolling. Thorough pre-production is the foundational best practice that separates polished, professional content from chaotic, amateurish results. It's a comprehensive preparation stage where you define your video's purpose, scope, and creative direction. This proactive approach, championed by meticulous creators like Christopher Nolan and Pixar, mitigates risks, prevents costly mistakes, and ensures everyone involved shares a unified vision.
From Concept to Concrete Plan
Pre-production transforms an abstract idea into an actionable blueprint. This involves several critical steps: developing a tight script, creating detailed storyboards or shot lists to visualize the final product, scouting and securing locations, and scheduling your cast and crew. A well-executed plan provides a clear roadmap, allowing your team to work efficiently and creatively once production begins.
A crucial part of this planning is financial. Establishing a clear budget from the outset helps you make informed decisions about equipment, talent, and locations. To avoid common pitfalls like scope creep and overspending, it’s vital to manage your production budget effectively with dedicated tools that track every expense.
The following infographic illustrates the core workflow of this crucial planning phase, breaking it down into a linear process.
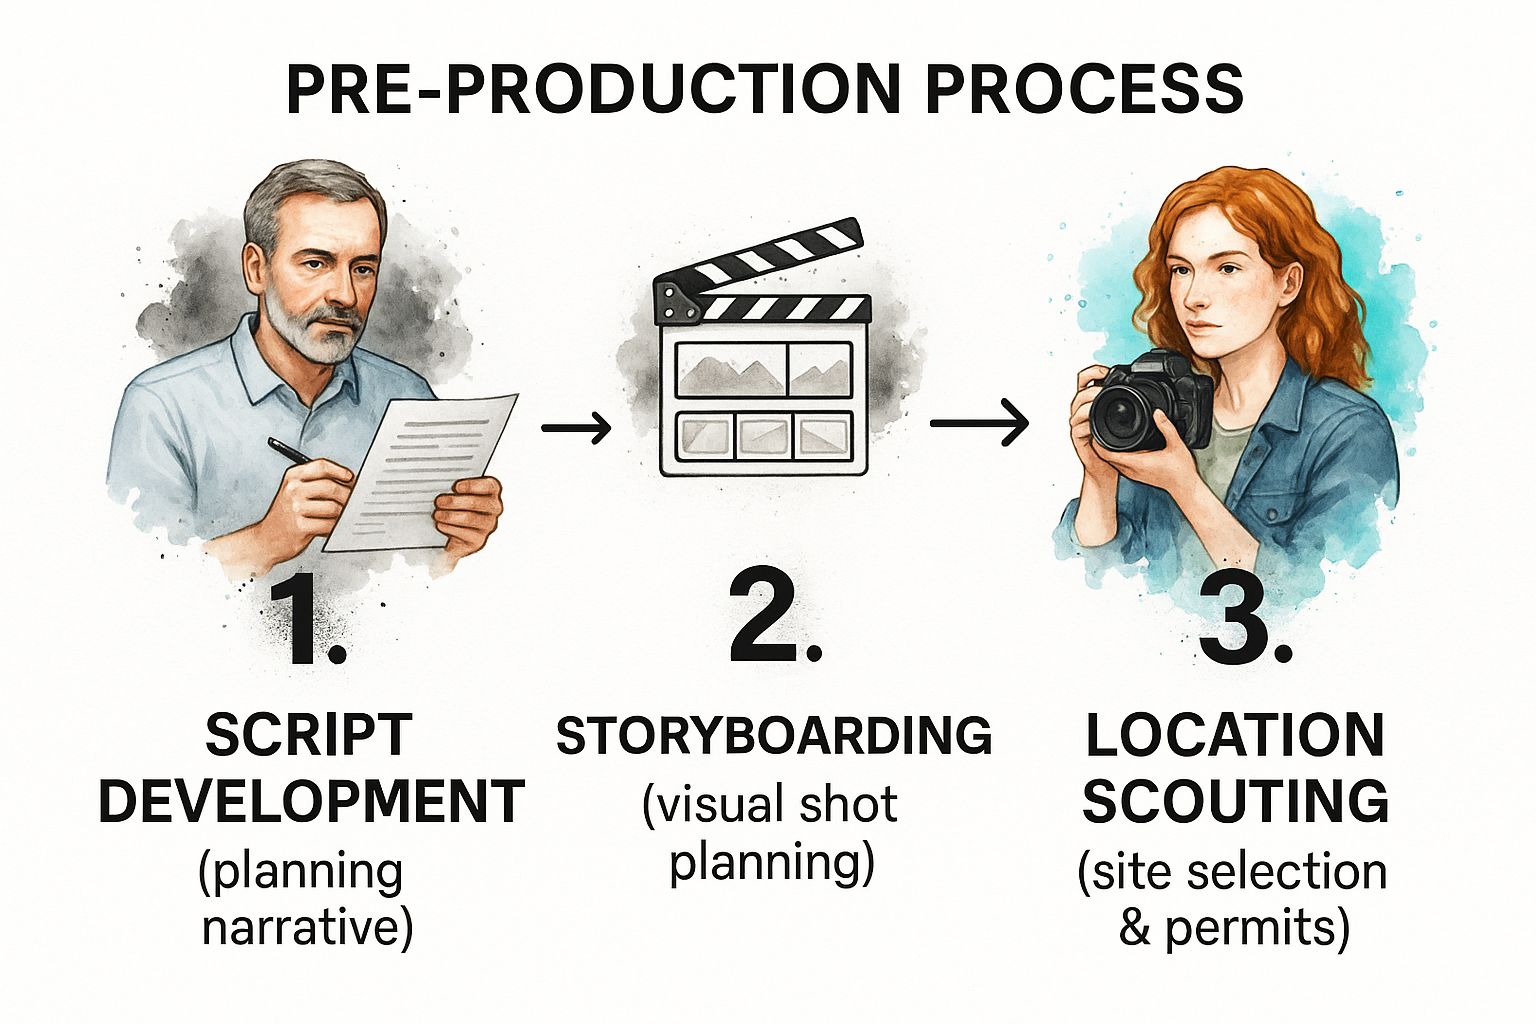
This visual flow underscores how each step logically builds upon the last, moving from the narrative foundation to the visual and logistical execution.
Actionable Pre-Production Tips
To maximize the effectiveness of your planning, integrate these professional habits:
- Build a Buffer: Always add at least a 20% time buffer into your shooting schedule. This accounts for unexpected delays, creative detours, or technical issues without derailing the entire project.
- Conduct Table Reads: For narrative or interview-based content, a simple table read with your cast or key speakers can reveal awkward phrasing and pacing issues in the script before you’re on set.
- Scout with a Purpose: Visit potential locations at the same time of day you plan to shoot. This allows you to check for lighting conditions, ambient noise, and potential logistical challenges that could disrupt filming.
By investing heavily in this initial stage, you are setting the entire project up for success. To dive deeper into managing this complex phase, you can explore our detailed guide on video production project management. Learn more about organizing your pre-production workflow.
2. Rule of Thirds and Visual Composition
The human eye is naturally drawn to specific points within a frame, and understanding this is key to compelling cinematography. The Rule of Thirds is a cornerstone of visual composition, one of the most fundamental video production best practices for creating engaging and professional-looking shots. This principle involves mentally dividing your frame into a 3x3 grid with two horizontal and two vertical lines. By placing key subjects and elements along these lines or at their four intersection points, you create a more dynamic, balanced, and visually interesting composition than simply centering the subject.

From Static to Dynamic Framing
Applying the Rule of Thirds instantly elevates your footage from a simple recording to a deliberate composition. Instead of placing your subject dead-center, which can feel static and confrontational, positioning them off-center adds visual breathing room and context. This technique guides the viewer's eye through the scene naturally, making the viewing experience more pleasant and immersive.
This practice is championed by legendary cinematographers like Roger Deakins, whose expansive landscapes in Blade Runner 2049 often place the horizon on a third line to emphasize either the sky or the ground. Modern creators like Peter McKinnon also use it extensively in travel vlogs to frame subjects against dramatic backdrops. While masters like Wes Anderson famously break this rule for symmetrical effect, understanding it first is what makes their stylistic choices so powerful.
Actionable Composition Tips
To effectively integrate this principle into your workflow, practice these framing techniques:
- Enable Grid Lines: Nearly every modern camera, from DSLRs to smartphones, has an option to display a 3x3 grid overlay on the screen or in the viewfinder. Turn it on to make composing your shots precise and intuitive.
- Position Horizons Deliberately: When shooting landscapes or establishing shots, place the horizon along the top or bottom horizontal line, not in the middle. Place it on the bottom line to emphasize a dramatic sky, or on the top line to focus on the foreground.
- Focus on the Eyes: For interviews or close-ups, position your subject's dominant eye directly on one of the upper intersection points. This creates a powerful connection with the viewer.
- Use Leading Lines: Combine the Rule of Thirds with leading lines, such as a road, fence, or river, to guide the viewer’s gaze toward your subject, which should be placed on one of the power points.
Mastering composition is essential for telling a visual story effectively. To further enhance your framing skills, consider exploring advanced techniques. You can learn more about cinematic composition beyond the basics to truly make your visuals stand out.
3. Professional Audio Recording and Management
Audiences will forgive shaky visuals, but they will instantly click away from a video with poor audio. Professional audio recording and management is a critical best practice that ensures your message is heard clearly and effectively. This practice moves beyond relying on in-camera microphones and involves using dedicated equipment and precise techniques to capture pristine sound. Industry pioneers like sound designer Walter Murch have long established that what we hear is just as, if not more, important than what we see, shaping the viewer's emotional response and comprehension.
From Muffled to Mastered
High-quality audio starts with capturing the sound cleanly at its source. This means selecting the right microphone for the job, whether it's a lavalier mic for a clear interview, a shotgun mic to isolate a subject's dialogue, or a multi-mic setup for a podcast. YouTube creators like Marques Brownlee exemplify this, using carefully placed microphones to achieve consistent, broadcast-quality sound that reinforces their professional brand.
The goal is to record audio that is rich, clear, and free of distracting background noise. This requires actively monitoring levels to prevent distortion, a process known as "peaking" or "clipping." By implementing a deliberate audio strategy, you elevate your production value significantly, ensuring your final product sounds as polished as it looks.
Actionable Audio Tips
To immediately improve your sound quality, incorporate these professional habits into your workflow:
- Always Monitor: Wear headphones during recording. This is the only way to know what the microphone is actually capturing, allowing you to catch issues like wind noise, rustling clothes, or electrical interference in real time.
- Capture Room Tone: Before or after an interview, record at least 30 seconds of the location's ambient sound with everyone silent. This "room tone" is essential for post-production, enabling you to smooth out audio edits and fill gaps for a seamless soundscape.
- Record at Safe Levels: Set your audio recording levels to peak between -12dB and -6dB. This provides enough headroom to avoid clipping (digital distortion) if a sound is unexpectedly loud, while still being strong enough to minimize background hiss.
- Maintain Proximity: Keep the microphone as close to your sound source as possible, ideally 6-12 inches away. The closer the mic, the stronger the desired signal will be relative to any unwanted background noise.
4. Consistent and Intentional Lighting Design
Lighting is the language of cinematography; it sculpts subjects, directs the viewer's eye, and establishes the emotional tone of a scene. A core tenet of professional video production best practices is the use of consistent and intentional lighting. This goes beyond simply illuminating a subject; it’s about strategically shaping light and shadow to enhance the narrative, create depth, and ensure visual continuity. This deliberate approach, mastered by cinematographers like Roger Deakins, transforms flat, uninspired visuals into compelling, cinematic experiences.

From Illumination to Storytelling
Effective lighting design turns light into a storytelling tool. The classic three-point lighting setup (key, fill, and back light) is the foundation for creating dimension and separating your subject from the background. By adjusting the intensity and position of these lights, you can create different moods, from the dramatic high-contrast look of film noir to the bright, welcoming feel of a corporate interview.
Consistency is paramount. Whether it's a multi-scene narrative or a series of YouTube videos, maintaining a consistent color temperature and lighting style creates a cohesive and professional brand identity. This is evident in the work of tech creator MKBHD, whose distinct, polished studio lighting is instantly recognizable, and in Netflix productions, where meticulous lighting and color grading create a unified aesthetic across an entire series. This control ensures your story is told exactly as you envisioned, without distracting inconsistencies.
Actionable Lighting Tips
To elevate your lighting from functional to cinematic, apply these professional techniques:
- Soften Your Source: Use soft, diffused light for more flattering results, especially for interviews or portraits. A large light source placed close to the subject, or a smaller light shot through a softbox or diffusion fabric, will wrap gently around your subject and minimize harsh shadows.
- Embrace the Golden Hour: For outdoor shoots, filming during the "golden hour" (the first hour after sunrise and the last hour before sunset) provides a warm, soft, and naturally beautiful light that is difficult to replicate artificially.
- Motivate Your Light: Whenever possible, make your artificial lighting sources feel natural by "motivating" them with practical lights in the scene, such as a lamp, window, or computer screen. This adds realism and makes the lighting feel integrated into the environment.
By mastering light, you gain control over the visual and emotional texture of your videos. To further your skills in this area, you can learn more about advanced lighting setups for video production.
5. Smooth Camera Movement and Stabilization
Unstable, shaky footage is one of the clearest signs of amateur video production. Smooth camera movement and stabilization are essential best practices for creating a professional and immersive viewing experience. This practice involves using specific equipment and techniques to ensure every camera motion is intentional, fluid, and serves the story. From the epic Steadicam shots in The Shining to the dynamic gimbal work of modern creators like Sam Kolder, controlled movement elevates production value by guiding the audience’s eye without distraction.
From Shaky to Cinematic
The goal of stabilization is to transform chaotic, unintentional jitter into purposeful, cinematic motion. This is achieved using tools like tripods for static shots, sliders for linear moves, and gimbals for complex, dynamic sequences. Even handheld shooting can be stabilized through proper technique. By eliminating distracting shakes, you allow the viewer to focus on the subject and narrative, creating a more polished and engaging final product.
Proper stabilization isn't just about avoiding bumps; it's a storytelling tool. A slow, steady push-in can build tension, while a smooth orbit around a subject can create a feeling of intimacy or importance. This video from Peter McKinnon demonstrates how to achieve these cinematic movements.
This practical tutorial shows how even simple, well-executed movements can dramatically enhance the quality of your video projects.
Actionable Stabilization Tips
To achieve professional-level stability in your work, implement these techniques:
- Master the "Ninja Walk": When shooting handheld or with a gimbal, bend your knees and walk heel-to-toe. Use your entire body as a natural shock absorber to minimize vertical bouncing.
- Balance is Everything: Always perfectly balance your camera on a gimbal or Steadicam before you start shooting. An improperly balanced rig will struggle to keep shots steady and will strain the motors.
- Plan and Rehearse: Don’t improvise complex camera moves on the fly. Plan your path, rehearse the movement without recording, and clear any obstacles to ensure a smooth, clean take.
- Use a Tripod for Static Shots: For interviews, talking heads, or landscape shots, nothing beats the solid stability of a good tripod. It eliminates all micro-jitters and ensures a professional, grounded look.
6. Strategic Shot Variety and Coverage
One of the most powerful video production best practices for creating a dynamic and engaging final product is capturing extensive coverage. This means filming every scene from multiple angles, perspectives, and shot sizes, providing your editor with a rich palette of visual options. This technique, mastered by cinematic giants like Martin Scorsese and modern creators like Casey Neistat, ensures you have the necessary footage to pace your story effectively, emphasize key moments, and maintain visual interest. It transforms a static scene into a compelling narrative experience.
From Single Take to Visual Story
Strategic coverage is the art of giving yourself options in post-production. Instead of a single, static take, you capture wide establishing shots to set the scene, medium shots to show interaction, and tight close-ups to convey emotion. This collection of footage allows an editor to build sequences that guide the viewer's eye and control the story’s rhythm. For example, a documentary filmmaker might use a three-camera setup for an interview to seamlessly cut between a wide view, a medium shot of the subject, and a close-up to capture a powerful reaction.
This practice is essential for avoiding jarring jump cuts and creating a polished, professional look. Having a variety of shots, including B-roll and cutaways, allows you to mask edits, cover mistakes, or simply add context and depth. This forethought during production is what empowers creative storytelling during editing, preventing a rigid and visually boring final cut.
Actionable Coverage Tips
To ensure your footage provides maximum flexibility in the edit, adopt these professional shooting habits:
- Follow the 180-Degree Rule: To maintain a clear sense of direction and spatial continuity, always keep the camera on one side of an imaginary line between your subjects. Crossing this line can disorient the viewer.
- Capture the Core Trio: For every important action or line of dialogue, make sure to get at least three distinct shot sizes: a wide, a medium, and a close-up. This is the fundamental building block of effective coverage.
- Shoot B-Roll Generously: Always capture more B-roll (supplemental footage) than you think you'll need. This includes shots of the environment, close-ups of relevant objects (insert shots), and reaction shots from other people in the scene. This footage is invaluable for pacing and storytelling.
7. Efficient Post-Production Workflow
The quality of your final video is forged in the post-production phase, where raw footage is meticulously shaped into a compelling narrative. An efficient post-production workflow is not about rushing; it's a systematic best practice for organizing, editing, and finalizing your project to maximize quality and minimize wasted time. Legendary editors like Thelma Schoonmaker and Walter Murch have built careers on disciplined, repeatable processes. This structured approach prevents chaos, protects your media, and ensures a smooth journey from rough cut to final delivery.
From Raw Footage to Polished Product
Post-production transforms disorganized media files into a coherent, professional video through a series of dedicated stages. This involves organizing assets, editing the sequence, refining the color, mixing the audio, and exporting the final master file. A systematic workflow, like those used in Hollywood pipelines with Avid Media Composer or by agile YouTube creators with Adobe Premiere Pro, ensures each stage is completed thoroughly without creating bottlenecks or requiring rework.
A significant portion of post-production excellence lies in perfecting your sound; explore comprehensive strategies for mastering the audio post-production workflow to ensure a professional soundscape. Adopting a phased approach where you focus on one task at a time, such as picture lock before color grading, prevents distractions and improves the final quality of each element.
Actionable Post-Production Tips
To build a more streamlined and resilient editing process, integrate these professional habits:
- Standardize Your Workspace: Create a consistent folder structure (e.g., Footage, Audio, Graphics, Projects) and naming conventions for every project. This discipline saves countless hours searching for files and makes collaboration seamless.
- Use Proxy Media: When working with 4K or higher resolution footage, create low-resolution proxy files for editing. This allows for smooth playback and a responsive timeline on most systems, drastically speeding up the cutting process.
- Implement the 3-2-1 Backup Rule: Maintain three copies of your project and media on at least two different types of storage media, with one copy stored off-site. This rule is the industry standard for protecting your work against data loss.
By implementing a structured workflow, you turn the potentially overwhelming post-production phase into a predictable and creative process. To further optimize your entire pipeline, explore our guide to the post-production process. Learn more about developing a seamless post-production system.
8. Color Grading and Visual Consistency
Color is a powerful storytelling tool that operates on a subconscious level, influencing emotion and establishing a consistent visual identity. The practice of color grading and correction is what transforms raw, flat footage into a cinematic and cohesive final product. It's the final polish that ensures your video not only looks professional but also feels emotionally resonant, a technique mastered by industry titans like Stefan Sonnenfeld and popularized by creators like Sam Kolder. This process is one of the most critical video production best practices for unifying your project's aesthetic.
From Correction to Creative Intent
The color process is twofold: first comes primary correction, then creative grading. Correction is the technical step where you balance exposure, fix white balance, and ensure continuity between clips. This creates a clean, neutral canvas. Once corrected, creative grading applies a stylistic look that supports the narrative. Think of the consistent, slightly desaturated but rich palette of the Marvel Cinematic Universe or the distinct, vibrant pastels in a Wes Anderson film. These looks are intentional choices that define the viewing experience.
This meticulous attention to color ensures that skin tones look natural and that the mood is precisely controlled. Whether you’re aiming for a warm, inviting feel for a lifestyle brand or a cool, sleek look for a tech product, color grading is the tool that gets you there. A consistent color palette across a series or campaign builds brand recognition and visual authority.
Actionable Color Grading Tips
To elevate your project's visual language, integrate these professional color grading habits:
- Correct First, Grade Second: Always perform primary corrections like balancing exposure, contrast, and white balance on all your clips before applying any creative or stylistic look. This ensures a consistent and clean foundation.
- Trust a Calibrated Monitor: Your laptop screen is likely inaccurate. For serious color work, use a professionally calibrated external monitor to ensure the colors you see are the colors your audience will see.
- Develop and Use LUTs: Create and save custom Look-Up Tables (LUTs) for your projects. This allows you to apply a consistent, signature look across multiple videos with a single click, saving time and maintaining brand identity.
- Prioritize Skin Tones: The human eye is incredibly sensitive to unnatural skin tones. Use scopes like a vectorscope to ensure skin tones fall along the "skin tone line," making your subjects look natural and healthy.
- Study the Masters: Analyze the color palettes of films, shows, and commercials you admire. Deconstruct how color is used to support the story and mood, and use these insights as a reference for your own work.
9. Effective Storytelling Structure
A powerful message delivered without a compelling narrative framework will fail to connect. Effective storytelling structure is the best practice of applying proven narrative models to your video, ensuring your content captivates, engages, and resonates with your audience. It's the architecture that transforms a collection of facts or scenes into a memorable experience. This principle, mastered by storytellers from the Pixar team to vlogger Casey Neistat, ensures viewers are invested from the first frame to the last.
From Information to Impactful Narrative
A strong story structure provides a journey for the viewer, guiding them through a clear beginning, middle, and end. This involves establishing a hook, introducing a conflict or question, developing the central idea, and concluding with a satisfying resolution or call to action. Whether it’s a three-act structure in an ad campaign or a problem-solution framework in a TED Talk, the goal is to create emotional and intellectual buy-in.
This structured approach makes your message more persuasive and digestible. A well-paced narrative with clear stakes keeps viewers watching, boosting engagement metrics and message retention. To implement this, you must first translate your core message into a narrative blueprint, which is a core part of the scripting process. A solid script is the foundation of any story-driven video.
The following infographic highlights a classic narrative arc, a foundational concept in storytelling that can be adapted for any video format.
This visual representation shows how tension should build and release, providing a rhythm that keeps audiences engaged throughout the viewing experience.
Actionable Storytelling Tips
To integrate powerful narrative techniques into your video production best practices, focus on these habits:
- Hook Within 15 Seconds: Start with a provocative question, a surprising statistic, or a compelling visual to grab attention immediately and establish the central theme.
- Establish Clear Stakes: Early on, let the audience know what is at risk or what problem needs solving. This creates instant investment, whether it’s for a character in a commercial or a concept in a tutorial.
- Create Character Arcs: Even in non-fiction or corporate videos, present subjects or ideas with a clear arc. Show a transformation, a challenge overcome, or a lesson learned to make the content more human and relatable.
By grounding your video in a solid story structure, you elevate it from simple information to a compelling and persuasive experience. To master this skill, you can begin by improving your foundational writing. Learn more about how to write video scripts that tell a story.
Video Production Best Practices Comparison
Integrating Excellence into Your Video Workflow
Embarking on the journey of video production can feel like navigating a complex landscape, but as we've explored, a map of established principles can guide you to outstanding results. The nine core areas we've detailed, from meticulous pre-production planning to the nuances of color grading, are not merely suggestions; they are the fundamental pillars of impactful visual storytelling. Mastering these video production best practices is what separates fleeting content from memorable, brand-defining media that engages and retains audiences.
Think of each practice as an interconnected gear in a larger machine. Your most compelling narrative structure will fall flat if the audio is unintelligible. Your perfectly executed lighting design will lose its power without strong visual composition and the Rule of Thirds. This synergy is the key to creating a polished, professional final product that feels intentional and authoritative.
From Principles to Practice: Your Actionable Roadmap
The true value of these best practices is unlocked through consistent application. To move from theory to execution, your team must internalize these concepts and build them into your everyday process. The goal is to make excellence a habit, not an occasional achievement.
Here are the most critical takeaways to focus on as you refine your approach:
- Foundation First: Never underestimate the power of pre-production. A detailed script, shot list, and storyboard are your most valuable assets on set. They save time, reduce stress, and ensure your final edit has all the necessary components.
- Sensory Experience: Video is a multi-sensory medium. Give as much attention to your audio recording and management as you do to your visuals. Crisp, clear sound is non-negotiable for audience engagement and credibility.
- Visual Language: Your camera is your narrator. Use strategic shot variety, smooth camera movement, and intentional lighting to guide the viewer's eye and evoke specific emotions. This creates a dynamic viewing experience that holds attention.
- Polished Finish: The work isn't done when the camera stops rolling. An efficient post-production workflow, including deliberate color grading and a clear storytelling structure, is what transforms raw footage into a cohesive and compelling final video.
Scaling Quality and Building a Cohesive Brand
For publishers, media companies, and marketing teams, the challenge intensifies. How do you maintain this high standard of quality across dozens, or even hundreds, of videos per month? How do you ensure every piece of content reinforces your brand identity? This is where process becomes paramount.
Developing a standardized yet flexible framework is crucial. This involves creating templates, establishing clear quality benchmarks, and providing ongoing training. Ultimately, integrating excellence means not just individual best practices, but a holistic approach to your entire creative pipeline. Learn more about mastering creative workflow management to ensure every stage of your video production is optimized for success.
By committing to these video production best practices, you are investing in your brand's future. You are building a library of high-value assets that can drive traffic, educate customers, and foster a loyal community. The consistency born from this commitment will become your signature, a mark of quality that viewers come to recognize and trust. The path to creating exceptional video is a continuous journey of learning and refinement, but with these principles as your guide, you are well-equipped to create content that not only looks professional but also achieves its strategic goals.
Ready to implement these best practices at scale without sacrificing quality or speed? Aeon leverages AI to automate the repetitive tasks of video creation, ensuring every video adheres to professional standards of editing, branding, and polish. Discover how you can elevate your entire video strategy by visiting the Aeon website today.