Having trouble with massive video files? The secret is learning how to compress videos by striking the right balance between file size and visual quality. It's a skill that anyone sharing content online needs to master, as it has a direct impact on everything from website speed and social media performance to just being able to share your work.
Why Smart Video Compression Matters Now
You've just wrapped up the perfect product demo or a stunning travel vlog. It's a 4K masterpiece, but you’re staring at a file that's several gigabytes large. Trying to upload that to your website would slow it to a crawl, and sending it through email is out of the question. This is a classic bottleneck that creators and businesses run into all the time.
That's why knowing how to properly compress a video isn't just a technical chore anymore—it's a core skill for communicating effectively in the digital world. This isn't just about shrinking files. It's about making your content actually work for you, leading to real-world benefits that can make or break your online success.
Boost Your Website and SEO
There's no bigger culprit for slow-loading web pages than large, uncompressed videos. Since we know page speed is a confirmed Google ranking factor, a heavy video can literally drag down your SEO efforts. Think about it: a visitor who has to sit and watch a buffering wheel is a visitor who's about to leave. That pushes up your bounce rate and tells search engines your page isn't delivering a great experience.
Smart compression gets your videos loading in a snap, keeping visitors engaged and improving your site's overall performance. A faster website isn't just good for users; it's exactly what search engines want to see.
Win on Social Media
Platforms like Instagram, TikTok, and Facebook all have their own automatic compression systems. But if you upload an already-optimized file, you get way more control over how it looks in the end. A massive file gets crushed by the platform's algorithm, often resulting in ugly artifacts and a blurry, unprofessional final product.
By pre-compressing your video to a platform’s recommended specs, you can make sure it stays crisp and clear when it goes live.
For a deeper dive into making your videos perform, our guide on a strong video content strategy offers valuable insights to boost engagement and conversions. It goes beyond the technical steps, because understanding how video content fits into a comprehensive digital marketing strategy is what ultimately drives real results.
When you get video compression right, you can:
- Share Content Seamlessly: Send demos to clients or share memories with family without hitting those frustrating file size limits.
- Save on Storage: Smaller files mean lower cloud storage bills and less strain on your local hard drives.
- Improve Viewer Experience: Fast-loading, buffer-free videos keep your audience happy and focused on your message, not on their loading screen.
Understanding How Video Compression Works

Before you can really get good at compressing videos, it helps to understand what’s actually happening under the hood. I like to think of it like packing a suitcase for a long trip. You're not just throwing clothes in; you're folding, rolling, and organizing everything to make it fit without turning it into a wrinkled mess.
In video, instead of clothes, you're packing a massive amount of visual and audio data. The goal is to intelligently remove any data that's repetitive or unnecessary—the stuff no one would notice is gone.
For example, imagine a simple video of someone talking in front of a plain wall. The background doesn't change for several seconds. A smart compression algorithm realizes it doesn't need to save the wall's image for every single frame. It saves the wall once and then just makes a note that it stays the same for the next few hundred frames. Simple, but incredibly effective.
This core idea—only sending the parts of the picture that change—isn't new. In fact, it dates all the way back to 1929, when a researcher first proposed it as a way to save precious analog TV bandwidth. This basic principle was the seed that grew into the complex digital methods we use today. If you're a history buff, you can see how video compression has evolved since 1929 on api.video.
The Role of Codecs and Containers
At the heart of any compression process, you’ll find two key components: codecs and containers. It’s crucial to know what they are and how they work together.
A codec (which is just a shorthand for coder-decoder) is the engine that does the heavy lifting. It’s the algorithm that actually compresses the video data on one end and then decompresses it for playback on the other. You’ve probably seen their names before, like H.264 (AVC) or its newer, more efficient cousin, H.265 (HEVC). H.264 is the undisputed king of compatibility, while H.265 can achieve the same quality at a lower file size but isn't supported everywhere just yet.
This codec lives inside a container format, which is the file type you see—like MP4, MOV, or AVI. The container is just a wrapper. It holds the compressed video, the audio, subtitles, and other metadata all together in one neat package. For almost any online use case, MP4 is the gold standard because it works on virtually every device and platform.
A simple analogy: If your video is a sandwich, the codec (H.264) is the recipe, and the container (MP4) is the lunchbox you put it in.
Lossy vs. Lossless Compression
There are two fundamental ways to shrink a file, and the one you choose has massive implications for your final video.
-
Lossy Compression: This is the workhorse of online video. It works by permanently removing some data from the file. The magic is that it's designed to toss out information that the human eye isn't very sensitive to. When done right, the drop in quality is imperceptible, but the file size reduction is massive.
-
Lossless Compression: This is more like zipping a folder. It reorganizes the data more efficiently but doesn't delete a single bit. You can perfectly reconstruct the original file. The catch? The size reduction is minimal, usually only 20-30% at best. It's just not practical for large video files meant for streaming or sharing.
For any video you plan to put on a website, email, or social media, you’ll be using lossy compression. The real art is making the compression visually lossless—meaning it looks identical to the original, even though data has been thrown away. You achieve this by tweaking the right settings.
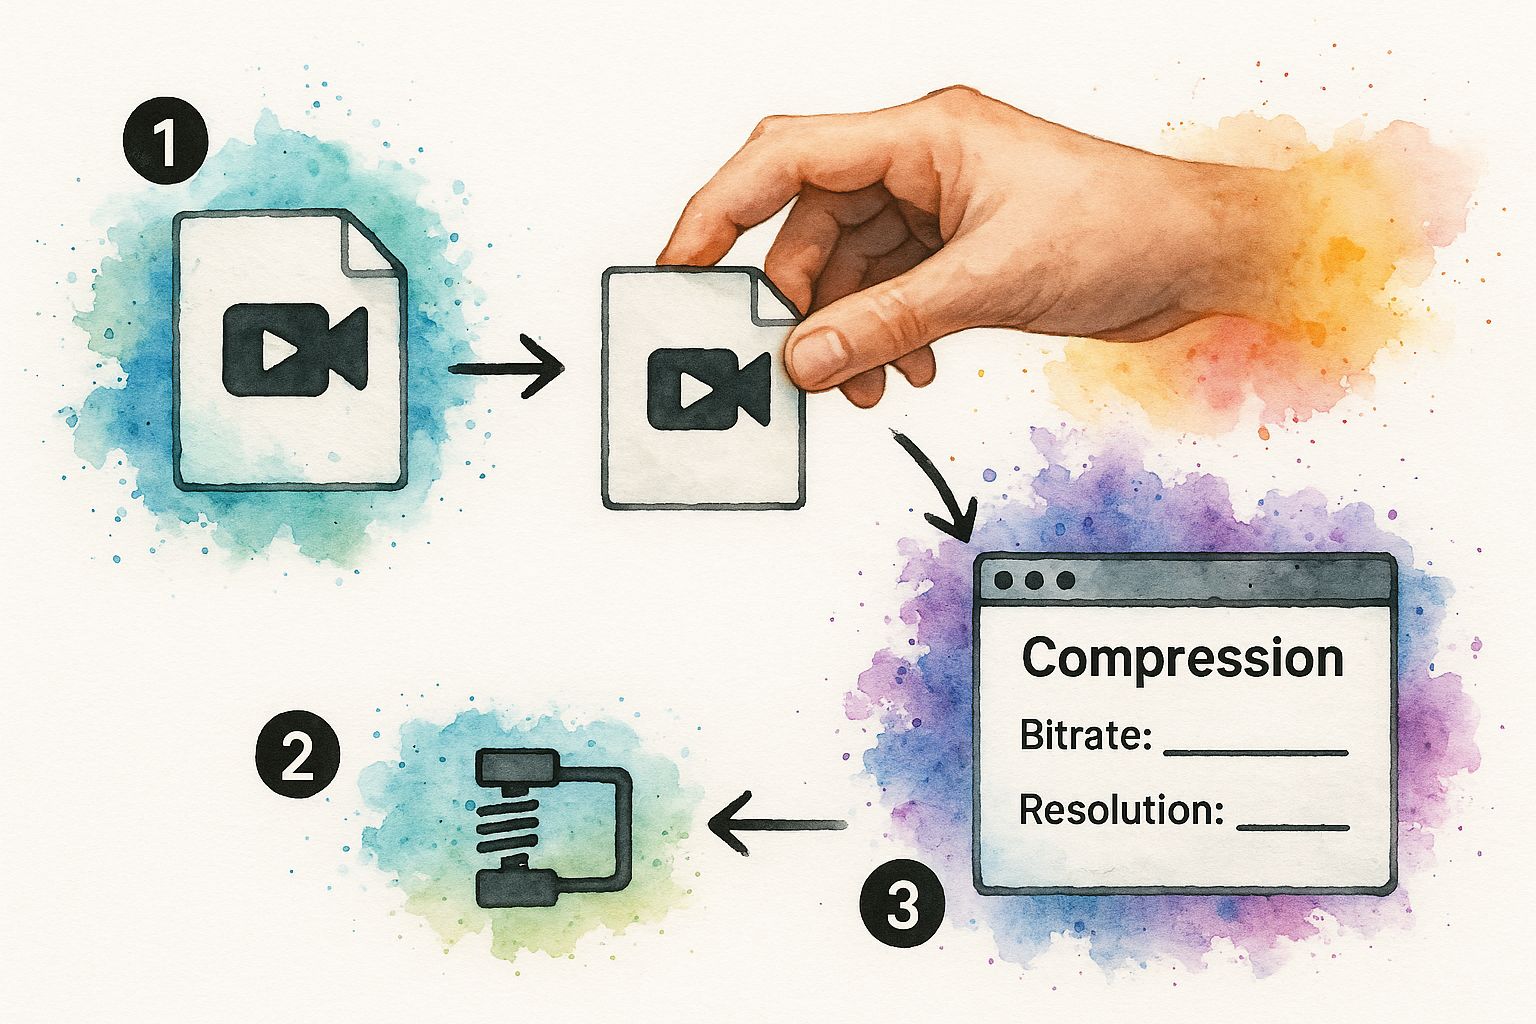
Key Settings That Control Your File Size
When you're compressing a video, you're always balancing file size against visual quality. You're in the driver's seat, and there are three main levers you can pull to control this tradeoff.
Understanding what these terms mean and how they affect your output is the most important step in mastering compression. Here’s a quick breakdown to get you started.
Key Compression Terms and Their Impact
Term
What It Is
Impact on File Size
Impact on Quality
Bitrate
The amount of data used to encode one second of video, measured in Mbps.
High: Large file
High: Crisp, detailed
Resolution
The number of pixels in each frame, like 1920x1080 (1080p) or 3840x2160 (4K).
High: Large file
High: Sharp, clear
Frame Rate
The number of individual frames displayed per second (fps), such as 24, 30, or 60 fps.
High: Larger file
High: Smoother motion
Each of these settings plays a role, but if you remember one thing, make it this: bitrate has the most direct impact on file size. It dictates the data budget for each second of video. Lowering the bitrate is the quickest way to make a file smaller, but if you drop it too low, you’ll end up with ugly, blocky artifacts.
Finding that perfect bitrate—low enough to create a small file but high enough to maintain quality—is the true skill in video compression.
Your Guide to Compressing Videos on Desktop
When you absolutely need precise control over your video compression, nothing beats desktop software. This is the path you take when you want to fine-tune every last setting, striking that perfect balance between a tiny file size and gorgeous visual quality. It's the method the pros and serious creators swear by.
Let's walk through a real-world scenario I see all the time. You’ve just shot a beautiful clip on your camera, but the 4K file is massive. We're talking a 5-minute clip that’s a whopping 10 GB. Your mission? Get it ready for a crisp 1080p YouTube upload without turning it into a pixelated mess.
For this job, we'll look at two powerhouse tools:
- HandBrake: This is an incredibly powerful, completely free, open-source tool. Honestly, it’s the best place for anyone to start learning desktop video compression.
- Adobe Media Encoder: The professional standard, especially for those already in the Adobe ecosystem with Premiere Pro. It offers a more integrated workflow.
Even though their interfaces look a bit different, the core principles and settings are almost identical. The logic you learn with one will apply just about everywhere else.
Getting Started with HandBrake
HandBrake can look a little intimidating at first glance, I get it. But its built-in presets make getting started surprisingly simple. For our 4K to 1080p YouTube project, the process is pretty straightforward.
First, you just drag and drop your 10 GB source file right into the main window.
This first step is always the same: you have to give the software your source video. Once it's loaded, all the powerful compression settings unlock, ready for you to work your magic.
My Personal Tip: Always, always start with a preset. In HandBrake, click the "Presets" dropdown menu and look for the "Web" folder. Choosing something like "Vimeo YouTube HQ 1080p60" (or 1080p30, if your source is 30fps) will instantly dial in most of the settings you need. It’s the perfect baseline to build from.
With the preset selected, you can head over to the "Video" tab to make specific tweaks. The most important settings here are the codec, quality, and bitrate. For a platform like YouTube, the H.264 (x264) codec is your safest bet for maximum compatibility and great quality.
Fine-Tuning Your Compression Settings
This is where you really take the driver's seat. The preset did a lot of the heavy lifting, but now it’s time to dial in the settings for that perfect result. Interestingly, the technology that makes all this possible has been around for decades.
A huge breakthrough came way back in 1972 with the proposal of the discrete cosine transform (DCT), which became the bedrock of modern video compression. It cleverly works by breaking images into frequency components and tossing out the ones our eyes don't notice as much. You can read more about the evolution of video compression on thebroadcastbridge.com.
Back in HandBrake's "Video" tab, you have a key decision to make: do you optimize for quality or for a specific bitrate?
-
Constant Quality: This is a fantastic setting. Instead of telling the software you want a certain file size, you tell it what level of visual quality to maintain. For 1080p web video, a value (RF) between 20 and 22 is the sweet spot. The software then uses whatever bitrate is needed to hit that target.
-
Average Bitrate (kbps): This is your go-to if you have a strict file size limit. For a high-quality 1080p YouTube video, setting the bitrate somewhere between 8,000 to 12,000 kbps will give you an excellent result.
Once you’ve made your choice, just double-check that the container format under the "Summary" tab is set to MP4. Now you’re ready. Hit "Start Encode" and let HandBrake do its thing. You'll watch it transform that 10 GB beast into a sleek file, often under 500 MB, with virtually no perceptible loss in quality.
Compressing Videos with Online and Mobile Tools
Sometimes you just need a quick fix. You don’t have the time or the permissions to download and install desktop software, but you need to shrink a video file right now. This is where online compressors and mobile apps really save the day.
They offer a fast, no-fuss way to compress videos when you're on the move, using a shared computer, or simply up against a tight deadline.
For a quick one-off task, like getting a clip over to a client for approval, browser-based tools are fantastic. You just upload your video, pick from a few simple settings, and download the smaller version a few moments later. There’s no installation, and the whole process is incredibly intuitive.
Of course, that convenience comes with a few trade-offs. Free online tools often have strict file size limits—many cap you at 500 MB. They might also place a watermark on your final video or raise privacy concerns if you’re working with sensitive footage. It's always a good idea to skim the terms of service before you upload anything proprietary.
A Quick Walkthrough with an Online Tool
Let's imagine you need to shrink a short product demo to embed in an email marketing campaign. Most online tools follow a similar, simple workflow.
First, you’ll see a big "Upload File" button or a drag-and-drop area. You just select the video from your computer to get started.
Next, you'll choose a compression level. Instead of getting bogged down in bitrates and codecs, these tools usually offer simple presets like "High Quality," "Medium File Size," or "Smallest File Size." For our product video, "High Quality" is probably the best bet to keep it looking sharp.
Finally, you hit "Compress." The tool crunches your video in the cloud and gives you a download link for your new, smaller MP4 file.
The entire process can take less than five minutes. For those urgent compression needs, these tools are an absolute lifesaver.
Using Your Phone to Compress Videos
But what if the video you need to shrink is already on your phone? Both iPhone and Android have built-in compression features, though they often work behind the scenes.
Ever noticed that a video you text to a friend looks a bit softer than the original? That’s your phone’s messaging app automatically squashing the video down to a size it can send quickly. It’s great for casual sharing, but you have zero control over the final quality.
For more control on the go, a dedicated mobile app is a much better choice. Apps like Video Compress for iPhone or Video Compressor on Android give you more power.
- Select a specific resolution to downscale to, like 1080p or 720p.
- Adjust the bitrate yourself to find the perfect balance between size and quality.
- Preview the final file size before you commit to compressing.
These apps pack a surprising amount of punch into a mobile-friendly interface. This approach is perfect for social media creators who shoot and edit entirely on their phones. Getting your assets properly sized is a huge part of a successful content strategy, something we dive into in our guide on ecommerce video marketing secrets. For anyone who needs a reliable workflow on their mobile device, these tools are indispensable.
Choosing the Right Settings for Any Platform
 Let's get one thing straight: there's no "one-size-fits-all" when it comes to video compression. How you compress a quick clip for TikTok is worlds away from how you’d prepare a high-resolution file for your professional portfolio. Get it wrong, and you're stuck with blurry uploads or massive files that take an eternity to process.
Think of this section as your personal cheat sheet. These are the proven recipes that take the guesswork out of the equation, so your videos look sharp and upload without a hitch, every single time. It's not just about file size, either. Dialing in the right settings makes your content look great and perform better, which is a key part of any good list of strategies to boost social media engagement.
Recommendations for Major Social Platforms
For most social media, you're playing a balancing act between visual clarity and fast load times, especially for people on their phones. While every platform has its quirks, a few ground rules apply almost everywhere.
First, your container format should always be MP4. It’s the universal standard, accepted literally everywhere.
The codec you choose is just as critical. The H.264 codec is your best bet for maximum compatibility. It’s been the workhorse of web video for years, and for good reason—it delivers fantastic quality at manageable file sizes. This codec essentially made platforms like YouTube possible back in the day.
Here's a quick breakdown of my go-to settings for the big players:
- YouTube: For a standard 1080p video, I aim for a bitrate between 8-12 Mbps. YouTube's re-compression engine is pretty sophisticated, so giving it a high-quality source file to work with yields the best results.
- Instagram & Facebook: These platforms are known for their aggressive compression. A bitrate of 5-8 Mbps for a 1080p video is the sweet spot. It's high enough to maintain quality but not so high that their algorithms completely crush your visuals.
- TikTok: Since TikToks are vertical and almost always watched on smaller screens, you have more leeway. A bitrate in the 4-7 Mbps range for a 1080x1920 video is plenty to keep things looking crisp.
Key Takeaway: When in doubt, go with an MP4 container and the H.264 codec. This combo is the gold standard for web video and will save you a world of compatibility headaches.
Compressing Videos for Email
Sending videos over email is a whole different ballgame. You're up against one major roadblock: strict attachment size limits. Most email services, like Gmail and Outlook, will reject anything over 25 MB.
This means you have to get aggressive with your compression. This is one of the few situations where you'll intentionally sacrifice a good bit of quality for the sake of size.
Here’s a tried-and-true recipe for making videos email-friendly:
- Drop the resolution. Go down to 720p (1280x720) or even 480p (854x480).
- Slash the bitrate. Aim for a very low 1-2 Mbps.
- Keep it short. The video should ideally be under 60 seconds.
Follow these steps, and you’ll easily get your file under that 25 MB ceiling. Sure, it won’t look like a cinematic masterpiece, but it will be perfectly watchable for a quick preview or update sent straight to someone's inbox.
Answering Your Top Video Compression Questions
Once you get your hands dirty with video compression, the same few questions always seem to surface. Getting these sorted out is often the difference between a smooth workflow and a day full of headaches. Let's clear up some of that common confusion.
First up, the big one: "What's the best format?" For pretty much anything you'll do online, MP4 with an H.264 codec is your go-to. It’s the industry workhorse for a reason—it delivers that perfect balance of great quality and small file sizes, and it plays nice with basically every website, social media platform, and device out there. You might bump into other formats like MOV or AVI, but for sharing online, MP4 is the undisputed champ.
Quality and Re-Compression Concerns
It's a common dream to shrink a video file without losing a single drop of quality. While "lossless" compression can technically do this, the file size reduction is so tiny it's not practical for streaming or sharing. To get those much smaller files we all need, you have to use "lossy" compression, which is a smart process of throwing away data you won't miss.
The real secret is to use settings that make this data loss completely invisible to the human eye. This gives you a "visually lossless" video—one that looks identical to the original. For most projects, that's the ultimate goal.
Here’s a critical piece of advice from experience: avoid re-compressing an already compressed video. Every time you save a video using a lossy method, you lose more data in a process called generation loss. It's like making a photocopy of a photocopy; the quality degrades with each step. Always, always try to work from your original, high-quality source file.
Finding the Right Bitrate
Another question I hear all the time is, "What's a good bitrate?" This is where you can really fine-tune your results.
For a standard 1080p video running at 30 frames per second, a bitrate between 8 to 12 Mbps is a fantastic starting point for platforms like YouTube. If you're aiming for social media feeds on Instagram or TikTok, you can often push that down to around 5 to 8 Mbps without anyone noticing.
My pro tip? Always do a quick test export. Render out a short 10-second clip to check the visual quality before you commit to a long render for the full video.
Mastering these settings doesn't just make your videos look better; it also unlocks new opportunities. For example, perfectly optimized videos are a must-have for many of the 7 proven ways for monetizing video content you might be looking to try.
At Aeon, we help you create compelling video from any source material, automatically optimized for every platform. Discover how our platform can streamline your video production.