So, what is video rendering? It’s the magic that happens after all your creative work is done. It’s the process where your computer takes all the separate pieces of your video project—the video clips, audio tracks, graphics, special effects, and text—and fuses them together into a single, playable video file.
Think of it as baking a cake. Your project file is the recipe, and all your assets are the ingredients. Rendering is the act of mixing everything together and putting it in the oven. What comes out is the final, finished cake—a cohesive file that anyone can enjoy.
Understanding Video Rendering: An Essential First Look

That progress bar slowly inching its way to 100% is a familiar sight for any video creator. This is rendering in action. It's the moment your powerful computer puts its head down and gets to work, turning your complex editing timeline into a final product.
Without this step, your masterpiece would be stuck inside your editing software, unwatchable by anyone else. Rendering is what transforms that jumble of edits and effects into a standard format like an .MP4 or .MOV file, ready for YouTube, Instagram, or the big screen.
From Splicing Film to Digital Workflows
Believe it or not, the core idea of rendering isn't new. It’s always been about creating a final master copy from raw materials. Before digital, this was a manual job of literally cutting and gluing strips of film together.
The digital revolution changed everything. Systems like Newtek's Video Toaster Flyer in 1990 brought CPU-based rendering out of high-end studios and into the hands of more creators. Suddenly, the painstaking physical process was replaced by computational power.
At its heart, rendering is the bridge between your creative decisions and your audience's experience. It’s where your computer:
- Finalizes Edits: All those cuts, transitions, and color grades are permanently "burned" into the footage.
- Generates Effects: Motion graphics, text, and visual effects are calculated and layered on top of the video.
- Compresses and Encodes: The massive amount of processed data is squeezed down into a manageable file size for playback and sharing.
Rendering is fundamentally a process of computation. Your computer calculates the final color and value for every single pixel in every single frame of your video, which is why it can be so resource-intensive.
To better visualize this journey, let's break down what goes in and what comes out.
Video Rendering From Project to Playback
This table shows how your raw project components are transformed into a polished video file.
As you can see, it's a true transformation. The output is a completely new file, built from the instructions and assets you provided.
It's also worth noting that rendering is different from other related processes. For instance, after a video is rendered, you might still need to change its format. To learn about that, you can understand the basics of video transcoding to see how files are converted after the initial export.
The Core Components: Frames, Codecs, and Containers
To really get what's happening under the hood during a video render, you need to understand the three building blocks of any video file. Think of these parts—frames, codecs, and containers—as a kind of digital assembly line for your visuals. They work together to take a huge mess of raw data and turn it into a single, clean file you can actually watch.
It all starts with frames. A frame is nothing more than a single still picture. When you string a bunch of them together and play them back quickly—usually at 24, 30, or 60 frames per second (FPS)—your brain is tricked into seeing motion. The higher the frame rate, the smoother everything looks, but it also means your computer has a much heavier lift during the rendering process.
Compressing the Data with Codecs
This is where the magic happens. A codec (short for coder-decoder) is a piece of software that takes all that frame data and shrinks it down to a manageable size. It’s a bit like a specialized language that knows how to intelligently discard visual information you won't miss, drastically cutting down the file size. Without codecs, a short video could take up terabytes of space.
You've probably run into some of these popular codecs:
- H.264 (AVC): For years, this has been the undisputed champion of web video. It offers a great balance of quality and small file size, making it the workhorse behind platforms like YouTube.
- H.265 (HEVC): This is the successor to H.264. It provides even more efficient compression, which is a lifesaver when you're working with 4K and 8K footage.
- Apple ProRes: A favorite in the professional editing world. It doesn't compress the video nearly as much, which means bigger files but a much smoother, higher-quality editing experience.
- AV1: The new kid on the block. It's an open-source codec that's gaining a lot of steam for its incredible efficiency, especially at super high resolutions.
Picking the right codec is always a balancing act between visual quality, file size, and where you need to play the video. It's a deep topic, and if you want to go further down the rabbit hole, our guide explaining what is video compression is a great next step.
Packaging Everything in a Container
Last but not least, you have the container. This is the digital "box" that holds everything together. It's the file type you actually see on your computer, like .MP4, .MOV, or .MKV. The container's job is to bundle the codec-processed video, the audio tracks, subtitles, and any other metadata into one tidy package.
This infographic breaks down that simple but essential workflow.
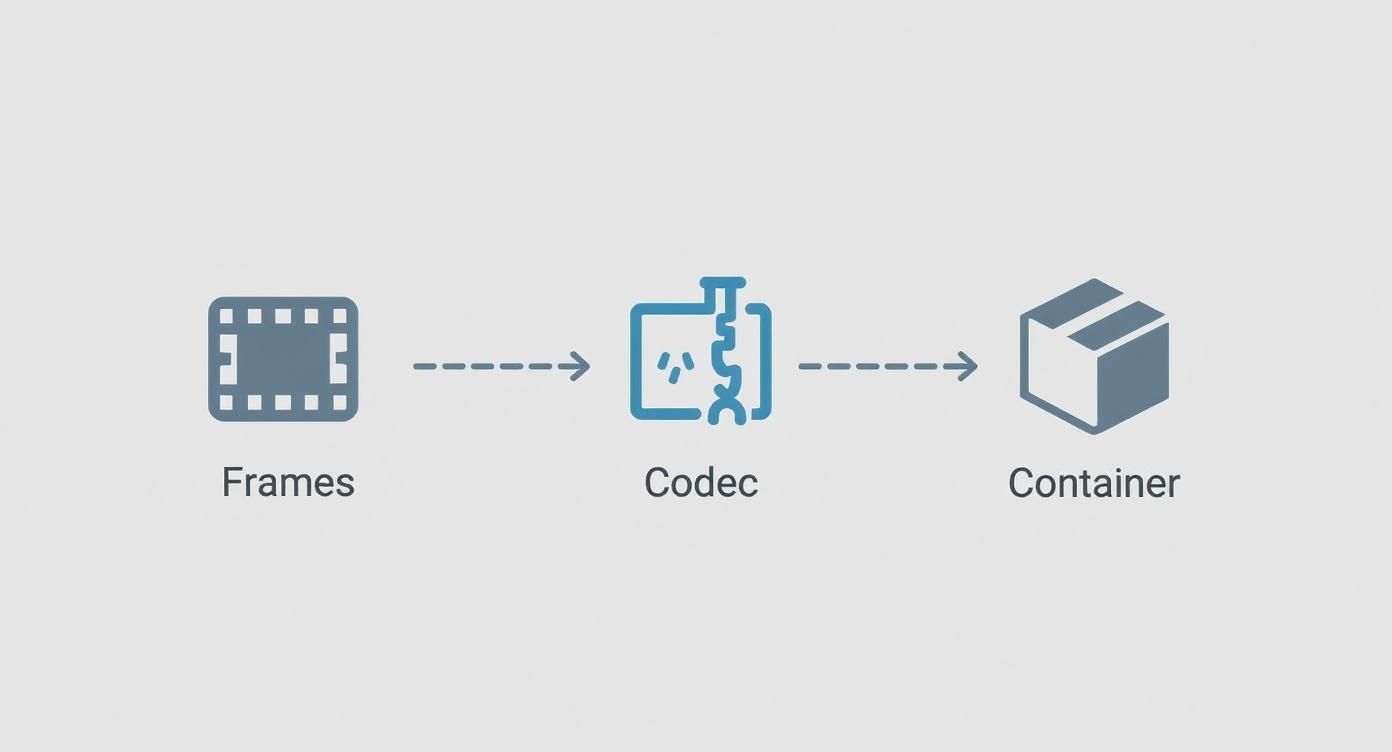
As you can see, the individual frames get squeezed down by the codec, then packed into a container along with everything else.
Key Takeaway: The container and codec you choose will determine your final quality, file size, and—most importantly—where your video can actually be played. For maximum compatibility, it's hard to go wrong with an .MP4 container using the H.264 codec.
Once you grasp how these three pieces fit together, the whole idea of rendering becomes much less intimidating. It's not one giant, mysterious step; it's a logical sequence of compressing and packaging that transforms a complex project into a simple, shareable video file.
How The Rendering Process Actually Works

When you finally hit that "Export" button, your computer kicks into high gear, starting an intense and highly calculated journey. This isn’t just a simple file conversion. Think of it more like a frame-by-frame construction project where your system is both the architect and the builder, piecing together your final video from thousands of individual components.
The whole thing starts when your editing software reads your project's timeline. This timeline is the master blueprint, holding every single instruction you've given it—every cut, transition, title, and sound adjustment. The software then starts at the beginning and works its way, methodically, to the very end.
For every single frame, the computer has to figure out the final look of each pixel. It layers on graphics, applies color grades, and generates any visual effects you've added. If a frame has something like a cross-dissolve, the system calculates the exact transparency level for two different clips as they blend together.
The Heavy Lifters: CPU vs. GPU Rendering
This massive computational load falls on your computer's core processors: the CPU (Central Processing Unit) or the GPU (Graphics Processing Unit). Getting a feel for what each one does is key to understanding what's really happening under the hood.
-
CPU Rendering: The CPU is like a highly skilled, meticulous craftsman. It can handle just about any task you give it with incredible precision, which makes it super reliable for complex effects and codecs. The catch is that it usually works on tasks one after another, which can slow things down.
-
GPU Rendering: The GPU, on the other hand, is like a massive assembly line with thousands of specialized workers. It was built from the ground up to handle thousands of similar, simple calculations all at once. This parallel processing makes it blazing fast for things like scaling, color correction, and applying effects.
Most modern video editing software, like Adobe Premiere Pro or DaVinci Resolve, uses a hybrid approach. This is often called hardware acceleration, where the GPU is tapped to speed up compatible effects, which can slash render times.
The choice between CPU and GPU isn't just about raw speed; it's also about stability and accuracy. Some really complex effects or specific codecs might only render correctly on the CPU, making it the go-to for final output in certain high-stakes professional workflows.
From Frames to a Finished File
Once a single frame is fully processed and looks exactly right, the next step is compression. Your software takes the codec you selected (like the common H.264) and uses it to shrink the frame's data down to a more manageable size.
This entire process is repeated for every frame in your video. To put that in perspective, a ten-minute video at 30 frames per second has 18,000 individual frames that need to be built and compressed.
Finally, all those compressed video frames are bundled together with your audio tracks into the container file you chose, like an .MP4. That final package is the video file you can upload, send, and share with the world.
The demands of this process have exploded over the years. A render that took 30 minutes for standard-definition video might now take hours for 4K footage on the same machine, simply due to the enormous increase in pixel data. To handle this, many global studios now rely on powerful render farms to get the job done.
Common Rendering Engines and Software You'll Encounter
So, what's actually doing all the heavy lifting when you export a video? That's the job of the rendering engine, the powerful core component inside your software that crunches all the numbers.
For most video editors, this engine is baked right into the programs you use every day. You're probably using one without even thinking about it. For instance, Adobe Premiere Pro and After Effects use the Adobe Media Encoder to handle the final output. Likewise, DaVinci Resolve and Apple's Final Cut Pro have their own highly optimized, built-in renderers designed to work seamlessly within their ecosystems.
These integrated renderers are specialists. Their main job is to take all your existing video clips, graphics, and effects, and compile them into a single, cohesive video file. If you're weighing your options, this in-depth video production software comparison guide can help you figure out which tool is the right fit.
A Quick Detour Into 3D Rendering
Things get a bit different when we step into the world of 3D animation and visual effects. The rendering engines here aren't just compiling existing footage—they're creating images entirely from scratch. They work by simulating how light bounces off virtual objects, textures, and materials to generate incredibly realistic or stylized visuals.
You'll often hear about these industry-standard 3D renderers:
- V-Ray: A powerhouse engine famous for its photorealistic results in architecture and film.
- OctaneRender: One of the first and fastest GPU-accelerated renderers, loved for its speed and real-time feedback.
- Blender Cycles: The physically-based path tracing engine built into the free and open-source software Blender, making high-end rendering accessible to everyone.
This screenshot from Blender's website gives you a peek at the interface, where creators can tap into powerful tools like the Cycles rendering engine.
You can see how different parts of the creative process, from modeling to final rendering, all come together in one place.
While both are called "renderers," their jobs are fundamentally different. Let's break down the key distinctions.
Video Editing Renderers vs 3D Animation Renderers
In short, video renderers assemble and finalize, while 3D renderers create from nothing.
One is like a master chef putting the finishing touches on a dish using prepped ingredients. The other is like a sculptor carving a masterpiece out of a raw block of stone.
This distinction is crucial for understanding what rendering means in different creative fields. Thankfully, modern hardware is speeding everything up. Leaps in GPU technology, like NVIDIA's RTX series, have massively accelerated both types of rendering. By using dedicated hardware for ray tracing and AI, these cards can speed up tasks by 5 to 10 times compared to older tech.
This massive performance boost has turned what used to be an overnight process into a much more interactive and creative workflow. To see just how far we've come, you can find more insights on the evolution of video technology on Videomaker.com.
Rendering in Action: Real-World Examples

The best way to truly grasp video rendering is to see how it solves real problems for different creators. The end goal of any project dictates every single choice made during the rendering process, from the software settings all the way down to the hardware crunching the numbers.
Let's start with a classic example: a YouTuber exporting their new 10-minute vlog. What matters most to them? Speed and accessibility. They need a final video that looks sharp on a phone or a big screen but is also small enough to upload without a massive wait.
For this creator, rendering is all about finding the sweet spot. They’ll almost certainly use a universal format like an .MP4 file with an H.264 codec. This combo guarantees smooth playback for their audience and keeps the file size manageable. On a solid editing rig, this kind of render might take 15-30 minutes—a perfectly reasonable trade-off to get their content live.
From Social Media to the Silver Screen
Now, let's jump to the other end of the spectrum. Picture a visual effects (VFX) artist working on a single shot for a Hollywood blockbuster. The priorities here couldn't be more different. Their job is to achieve absolute, uncompromising photorealism, where every single pixel has to be flawless to blend CGI into the live-action world.
This artist isn't just exporting a video. They’re generating a sequence of individual images from incredibly complex 3D data. A single frame might require simulating how light bounces off different surfaces, calculating realistic reflections, and casting perfect shadows—a task that can take hours. For just five seconds of screen time (120 frames), the total render time could easily stretch into days, often spread across a network of powerful machines called a render farm.
The core difference lies in the objective. The YouTuber optimizes for speed and distribution, while the VFX artist optimizes for pure visual fidelity, regardless of time or file size.
Interactive Experiences and Marketing
Finally, think about an architect using a real-time engine like Unreal Engine or Unity to build a virtual tour of a new building. Here, rendering isn't a final step you wait for; it's happening constantly, in real time, as the client "walks" through the 3D space.
This requires a beast of a GPU to calculate lighting, textures, and geometry on the fly, maintaining a smooth frame rate so the experience feels fluid and immersive. The same principles are at play in product design and marketing. For a great look at how rendering is used to sell products, it's worth learning about mastering 3D product animation, where products are brought to life with stunning detail.
Each of these scenarios shows that rendering isn't a one-size-fits-all process. It’s a tool that gets adapted and fine-tuned for the specific needs of the final product.
Getting Faster and Better Renders Every Time
There’s nothing worse than hitting "export" and seeing an estimated render time of several hours. That waiting game can bring any creative project to a screeching halt. But with a few smart workflow habits, you can turn this final bottleneck into an efficient, painless last step.
The goal is to reduce the workload on your computer, so it can deliver high-quality results without getting bogged down.
The single biggest game-changer for most editors? Using proxy files. Proxies are essentially low-resolution stand-ins for your high-quality source footage. Editing with these smaller, less demanding files makes your timeline feel snappy and responsive, even if you aren't working on a top-of-the-line machine.
Once you’re ready to export, the editing software automatically swaps the low-res proxies out for the original, full-quality files. This one trick can save you countless hours of frustration and stuttering playback during the creative process, leading to a much smoother final render.
Optimize Your Workflow and Settings
Beyond proxies, a few other tweaks can make a massive difference in your render times. It really comes down to simple maintenance and making thoughtful choices before you export.
-
Choose the Right Export Settings: Don't just stick with a generic preset. A video for YouTube has very different needs than one for Instagram Reels. Tailoring your codec, bitrate, and resolution to the final platform will not only speed up the render but also optimize the viewing experience.
-
Enable Hardware Acceleration: This is a big one. Dig into your software’s preferences and make sure you’ve enabled GPU rendering (sometimes called CUDA, Metal, or OpenCL). This tells the software to use your powerful graphics card for the heavy lifting, which it's built for, drastically cutting down export times.
-
Keep Your Tools Sharp: Always keep your editing software and, just as importantly, your graphics card drivers updated. Developers constantly release performance improvements and bug fixes that can directly boost rendering speed and stability.
A clean workspace is a fast workspace. Make it a habit to regularly clear your software's cache and media cache files. This frees up valuable disk space and stops old temporary data from slowing your system down.
Streamline Your Project Before Hitting 'Render'
Finally, a little housekeeping on your timeline before you export can work wonders. A cluttered, complex project is much harder for your computer to process.
Think about pre-rendering particularly demanding sections of your edit. If you have a clip loaded with heavy effects, motion graphics, or multiple stacked layers, rendering just that small portion "bakes in" the effects. This means your computer doesn't have to re-process those complex calculations during the final export.
By adopting these habits, you’re no longer at the mercy of the progress bar. You’re taking control of the rendering process, making sure it works for you, not against you.
Frequently Asked Questions About Video Rendering
Even after you get the hang of the basics, some specific questions always seem to pop up. Let's tackle a few of the most common ones that creators run into when they're deep in a project.
Why Is My Render Taking Forever?
It's the classic question every editor asks while staring at a progress bar. The simple answer is that your render time is a direct reflection of how much work you're asking your computer to do.
A few key things are at play here:
- Resolution and Length: A 10-minute 4K video has a mountain of pixel data to crunch through compared to a quick 30-second 1080p clip. It's an exponential difference.
- Effects and Complexity: Think of every color grade, motion graphic, or stabilization effect as another math problem your computer has to solve. The more layers you add, the more complex the equation gets for every single frame.
- Your Hardware: At the end of the day, the speed of your CPU, GPU, and RAM is the biggest factor. A more powerful machine will chew through those calculations much faster.
Your computer is essentially performing billions of calculations to build that final video file. It's one of the most demanding tasks you can throw at a machine.
The Bottom Line: Rendering time is always a trade-off between project complexity and your computer's power. Higher resolutions and more effects will always take longer.
Are Rendering and Exporting the Same Thing?
People often use these terms interchangeably, but they actually refer to two distinct stages of the process. Think of it like baking a cake.
Rendering is the "baking" part. It’s the technical process where the software computes all your edits, effects, and color grades to create the final look of each individual frame. Exporting is like putting that cake in a box. It’s the final step of packaging all that rendered data into a single, playable file, like an .MP4.
So, rendering is how the visuals are created, and exporting is what packages them into a finished product.
Can I Still Use My Computer While It's Rendering?
You technically can, but you really, really shouldn't. The rendering process is designed to be a resource hog—it will grab as much of your computer's processing power as it can, often pushing your CPU or GPU to 100% utilization.
Trying to multitask will not only make the render take much longer, but it can also make your whole system unstable. You risk causing your editing software to crash, which could corrupt the entire export. It’s best to just let your computer do its thing and focus on the render.
Ready to bypass the rendering wait entirely? Aeon uses AI to instantly turn your existing articles, audio, or video clips into engaging social content, no exporting required. See how it works at Project Aeon.