In the fast-paced world of digital content, video reigns supreme. But behind every viral clip and high-conversion ad is a meticulous process. Without a clear plan, video creation can quickly become a chaotic, budget-draining endeavor. This is where a comprehensive video production checklist becomes your most valuable asset, transforming the complex journey from concept to final cut into a series of manageable, actionable steps. Much like the critical importance of using checklists in drone operations to ensure safety and precision, a structured checklist for video production guarantees consistency and prevents costly mistakes.
This guide provides an exhaustive, 8-step checklist covering every phase of production, from pre-production planning and scripting to post-production and distribution. We’ll dive into the specific actions required for each stage, ensuring no detail is overlooked. You will learn how to organize your workflow for maximum efficiency, covering key areas such as:
- Pre-Production: Nailing down the concept, script, and logistics.
- Production: Capturing high-quality footage and audio on set.
- Post-Production: Assembling, refining, and finalizing your video.
Furthermore, we will highlight how innovative platforms like Aeon leverage AI to automate and streamline these tasks. This allows publishers, media companies, and content creation teams to produce professional video at scale, turning text, audio, or existing footage into engaging content with unprecedented efficiency. Get ready to elevate your production workflow and achieve consistently professional results with a powerful, repeatable system.
1. Pre-Production Planning & Scripting
The foundation of any successful video is built long before the camera starts rolling. This is the pre-production phase, a critical stage where your entire project is meticulously planned from concept to execution. Think of it as the architectural blueprint for your video; without it, the final structure is likely to be unstable. This phase involves defining your video's core purpose, identifying the target audience, establishing key messages, and solidifying the overall creative vision.
Masters of cinema like Alfred Hitchcock and Christopher Nolan were famous for their obsessive pre-production planning, ensuring every shot was mapped out before filming. This level of detail isn't just for Hollywood blockbusters; it’s a vital part of any effective video production checklist. A well-executed pre-production phase saves time, money, and prevents major headaches during the shoot.
Streamlining the Core Creative Process
The script is the heart of your video. For teams using Aeon, this process is significantly accelerated. Aeon’s AI can analyze existing long-form content, like a blog post or whitepaper, and instantly generate a complete video script. This automation provides a structured first draft with suggested scenes and pacing, allowing your creative team to focus on refining the narrative and ensuring it aligns perfectly with your brand's voice.
This infographic outlines the core creative workflow within pre-production, moving from the written word to a visual shooting plan.
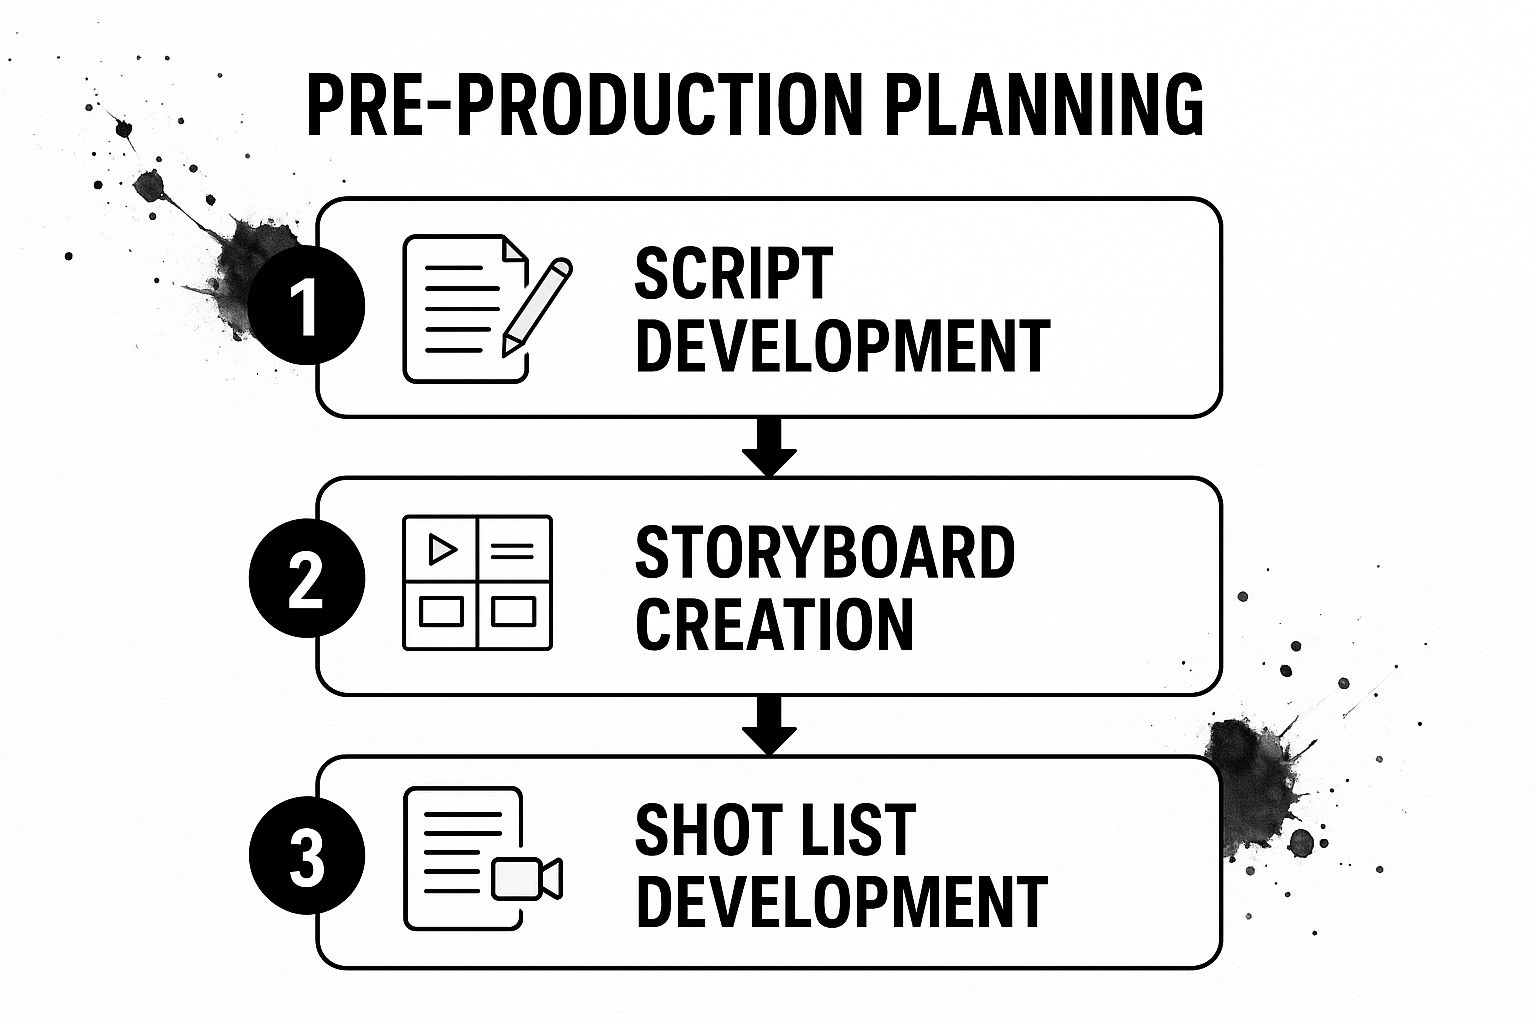
This visual flow underscores how each step logically builds on the last, ensuring a cohesive and well-planned production.
Actionable Pre-Production Tips
To ensure a smooth pre-production phase, focus on tangible outputs:
- Develop a Detailed Brief: Start with a document outlining objectives, budget constraints, timelines, and key performance indicators (KPIs).
- Create a Shot List: Go beyond scene descriptions. Detail every single shot, including camera angle, movement (e.g., pan, dolly, static), and lens choice.
- Plan for Contingencies: What’s your backup plan for bad weather on an outdoor shoot? What if a key piece of equipment fails? Answering these questions now prevents chaos later.
- Organize Your Assets: As part of your pre-production planning, especially for larger projects, you might need to consider renting specialized equipment. Efficiently managing these rentals can be crucial, and exploring options for efficient equipment booking solutions can save valuable time. For a deeper dive into crafting compelling narratives, you can learn more about how to write video scripts with our step-by-step guide.
2. Camera Equipment & Technical Setup
Once your creative blueprint is in place, the focus shifts to the tools that will bring your vision to life. The camera equipment and technical setup phase involves selecting and preparing all the hardware necessary to capture stunning visuals and crisp audio. This goes far beyond just picking a camera; it encompasses lenses, tripods, lighting, microphones, and all the accessories that ensure a smooth, professional shoot. Every piece of gear must be chosen to meet the specific creative and technical demands of your project.
The importance of this stage is exemplified by the exacting standards of platforms like Netflix, which have strict technical specifications for camera types and recording formats for their original productions. This meticulous approach, championed by figures like cinematographer Roger Deakins, ensures visual consistency and quality. For any team, a well-organized technical setup is a non-negotiable part of a comprehensive video production checklist, preventing on-set failures and guaranteeing high-quality raw footage.
Aligning Technology with Creative Intent
The choice of camera and lens directly impacts the story's visual tone. A project aiming for a cinematic, shallow-depth-of-field look, common in Hollywood films using RED Digital Cinema cameras, requires different gear than a run-and-gun documentary shoot, where cameras like Canon's C-series excel due to their versatility. Your technical setup must be a deliberate extension of your creative goals established during pre-production.
For teams managing multiple projects, Aeon helps maintain technical consistency. After generating a script, the platform can be used to store technical notes and equipment lists associated with specific projects or video styles. This creates a reusable template, ensuring that if you're recreating a certain look, your team instantly knows which camera, lens, and lighting configuration to use, streamlining the setup process significantly.
Actionable Technical Setup Tips
To avoid technical glitches and ensure you're ready for anything on shoot day, implement these practices:
- Create Tailored Checklists: Don't use a one-size-fits-all equipment list. Develop specific checklists for different shoot types (e.g., interview, outdoor b-roll, studio product shoot).
- Test Everything Beforehand: A full pre-shoot gear check is essential. Assemble the camera rig, test every port, format your memory cards, and check all battery levels a day before the shoot, not on set.
- Invest in Stability: Shaky footage is a hallmark of amateur video. A high-quality tripod, monopod, or gimbal is a critical investment that dramatically elevates production value.
- Pack Redundancies: The "two is one, and one is none" rule is paramount. Always bring backup batteries, memory cards, and essential cables. A single point of failure can derail an entire shooting day.
3. Audio Recording & Sound Design
While high-quality visuals are crucial, poor audio can instantly undermine an entire production. Audio recording and sound design encompass the complete process of capturing, editing, and mixing every sound element, from dialogue and ambient noise to music and effects. It's the often-unseen fifty percent of the final product that dictates the emotional tone and professional polish. Think of audio as the soul of your video; without clear, immersive sound, the viewer's connection is easily broken.
The work of sound design pioneers like Ben Burtt (Star Wars) and Walter Murch (Apocalypse Now) demonstrates how sound can build entire worlds and drive narratives. This principle is just as vital in corporate videos and marketing content as it is in cinema. A well-managed audio workflow is an non-negotiable part of any modern video production checklist. Quality sound elevates a project from amateur to professional, ensuring your message is not just seen, but truly heard and felt.
Enhancing Your Auditory Experience
A comprehensive approach to audio involves both capturing pristine sound on set and refining it in post-production. On set, this means using the right equipment for the environment, like the versatile recorders from Zoom or industry-standard microphones from manufacturers like Rode. Post-production is where the raw audio is cleaned, layered, and mixed. This is where Aeon's platform can be particularly helpful, allowing teams to seamlessly manage and review audio files alongside video clips, ensuring the sound design aligns perfectly with the visual storytelling.
For creators looking for licensed music, services like Epidemic Sound have become indispensable, offering vast libraries that can be easily integrated into the editing process. This holistic view of audio, from capture to final mix, ensures a cohesive and impactful final product.
Actionable Audio Tips
To guarantee your video sounds as good as it looks, integrate these practices:
- Always Record Room Tone: Capture at least 30 seconds of the ambient "silence" of each location. This allows you to smoothly fill audio gaps in post-production, avoiding jarring dead air.
- Use Windscreens and Shock Mounts: These simple accessories are essential for outdoor shoots and interviews. They dramatically reduce unwanted noise from wind and handling, saving you from unusable audio.
- Monitor Levels Continuously: Never "set it and forget it." Have a dedicated person monitor audio levels with headphones throughout the recording to catch issues like clipping or background noise in real time.
- Record at a Higher Quality: Capture your audio at a higher bit depth and sample rate (e.g., 24-bit/48kHz) than your final output requires. This gives you more flexibility for mixing and processing in post-production without degrading quality.
4. Lighting Design & Setup
Lighting is the paintbrush of cinematography; it sculpts the subjects, sets the mood, and directs the viewer's eye. This is the crucial stage where you transition from a flat, two-dimensional image to a dynamic, three-dimensional world. Lighting design involves the strategic placement and adjustment of light sources to create depth, shape, and atmosphere, ensuring every frame aligns with the project's creative vision. It’s a foundational element that can make or break the professional quality of your video.
Cinematographers like Roger Deakins and Emmanuel Lubezki are celebrated for their mastery of light, demonstrating how it can serve as a powerful narrative tool. Their work shows that thoughtful illumination is far more than just ensuring visibility; it's an essential part of any comprehensive video production checklist. Proper lighting elevates production value, evokes emotion, and ensures a clean, professional image that is easy to color grade in post-production.
Crafting the Visual Atmosphere
The right lighting setup makes your subjects pop and your scenes resonate. For narrative projects, this means creating a specific mood, such as the harsh, high-contrast lighting of a film noir or the soft, warm glow of a romantic scene. For corporate videos or interviews, the goal is often to create clean, flattering, and professional-looking illumination that makes the speaker look credible and engaging. The equipment you choose, from high-end ARRI and Aputure systems to accessible Godox solutions, directly impacts your ability to shape the light effectively.
This process is a blend of art and science, requiring an understanding of how light interacts with the camera's sensor, the environment, and the subject.
Actionable Lighting Tips
To ensure your lighting is effective and professional, focus on these practical steps:
- Master the Three-Point Setup: Start with the classic three-point lighting system (key, fill, and back light) as your foundation. This setup provides excellent subject separation and dimension, serving as a reliable starting point for almost any interview or single-subject shot.
- Embrace Diffusion: Hard, direct light creates harsh shadows and unflattering highlights. Use diffusion materials like softboxes, silks, or even a white sheet to soften your light source, creating a more pleasing and professional look.
- Maintain Color Consistency: Mix-and-matching light sources with different color temperatures (e.g., tungsten and daylight) can create an amateurish, discolored look. Ensure all your lights are set to the same color temperature (measured in Kelvin) to maintain visual consistency throughout a scene.
- Plan During Scouting: Use the location scout to identify power sources, window placements, and potential lighting challenges. Pre-planning your lighting rig based on the location saves immense time and prevents surprises on shoot day. You can use this phase to plan for rentals and logistics, for which you may find tools like booking software for rental businesses helpful in streamlining your equipment management.
5. Shot Composition & Cinematography
Once the set is lit and the actors are ready, the focus shifts to the art of cinematography. This is where you translate the written script and shot list into compelling visual language. Shot composition and cinematography involve the creative and technical process of framing, composing, and capturing shots that effectively tell the story and captivate your audience. It's about more than just pointing the camera; it’s about making deliberate choices with angles, movement, and focus to evoke specific emotions and guide the viewer's eye.
Filmmakers like Wes Anderson are renowned for their meticulous, symmetrical compositions, creating a distinct and memorable visual style. Similarly, on YouTube, creators like Casey Neistat revolutionized vlogging with dynamic, story-driven cinematography. These examples show that thoughtful composition is a critical component of any video production checklist, elevating simple footage into a professional and engaging narrative.
Mastering Visual Storytelling
The way you frame a shot communicates vast amounts of information. A low-angle shot can make a subject appear powerful, while a high-angle shot can make them seem vulnerable. This deliberate use of camera techniques is what separates amateur video from professional-grade content. It ensures every frame serves the story and enhances the intended message, making your final video more impactful.
This video provides a foundational understanding of composition principles that can immediately improve your cinematography.
Understanding these core concepts allows you to build a strong visual foundation for your project, ensuring it looks polished and professional.
Actionable Cinematography Tips
To capture stunning and effective footage during your shoot, keep these technical and creative guidelines in mind:
- Follow the Rule of Thirds: Mentally divide your frame into a 3x3 grid and place key subjects along the lines or at their intersections. This creates a more balanced and visually interesting composition than simply centering the subject.
- Capture Coverage: For every scene, shoot multiple angles and shot sizes (wide, medium, close-up). This "coverage" gives your editor tremendous flexibility in post-production to create a dynamic and well-paced sequence.
- Use Leading Lines: Incorporate natural or architectural lines (roads, fences, hallways) into your frame to draw the viewer’s eye toward the main subject.
- Maintain the 180-Degree Rule: When filming dialogue between two characters, keep the camera on one side of an imaginary line drawn between them. This maintains consistent screen direction and eye lines, preventing audience disorientation.
6. Post-Production Workflow & File Management
Once filming is complete, the project moves into post-production, a phase where raw footage is transformed into a polished final product. The efficiency of this stage hinges entirely on a systematic approach to workflow and file management. This is the digital organization system for all your assets, including video clips, audio recordings, graphics, and project files. A disciplined workflow prevents catastrophic data loss, speeds up the editing process, and makes collaboration seamless.
Major studios and production houses like Pixar and Netflix have perfected this process, building robust asset management pipelines that can handle terabytes of data across large, distributed teams. This level of organization isn't just for big-budget productions; it’s a non-negotiable part of any professional video production checklist. Proper file management is the unsung hero that ensures your creative vision isn't derailed by a lost file or corrupted project.
Structuring Your Digital Workspace
The core of a strong post-production workflow is a logical and repeatable folder structure. Before importing a single clip, create a master project folder with dedicated subfolders for Footage, Audio, Graphics, Project Files, and Exports. This simple act of organization ensures every team member knows exactly where to find and save assets, eliminating confusion and wasted time.
For teams leveraging Aeon, this structured approach is even more critical. When the AI generates a script and shot list, the assets you capture can be organized to match that predetermined structure. This alignment between the Aeon-generated plan and your file organization creates a highly efficient pipeline, allowing editors to quickly locate the specific clips needed for each scene outlined by the AI.
Actionable Post-Production Tips
To build a resilient and efficient post-production process, implement these key practices:
- Establish Naming Conventions: Before editing begins, create a clear file naming convention. A good format might be
[ProjectName]_[ShootDate]_[Scene#]_[Shot#]_[Take#].mov. Consistency is crucial. - Implement the 3-2-1 Backup Rule: Maintain three copies of your data on two different types of media, with at least one copy stored off-site (e.g., in the cloud or a separate physical location).
- Create Project Templates: If you produce similar types of videos regularly, create a template project file with your standard folder structure, bin organization, and preferred effects already set up.
- Regularly Clean Project Files: Periodically purge unused clips, old render files, and duplicate assets from your project to keep it running smoothly and reduce file size. For a more comprehensive guide on this topic, you can learn more about mastering digital asset management for video.
7. Color Correction & Visual Enhancement
Color correction and grading are the final, transformative steps that turn raw footage into a polished, cinematic product. This post-production phase is where the mood, tone, and visual consistency of your video are defined. Correction is the technical process of fixing issues like exposure and white balance, while grading is the creative process of applying a specific look or style. Without this crucial step, even the best-shot footage can look flat, unprofessional, and disjointed.
Renowned colorists like Stefan Sonnenfeld, who has shaped the look of countless Hollywood blockbusters, demonstrate how powerful color can be in storytelling. This process is a non-negotiable part of any professional video production checklist, ensuring your final product not only looks cohesive but also evokes the intended emotional response from your audience. It’s the difference between an amateur video and a broadcast-quality masterpiece.
Streamlining the Visual Polishing Process
The color grading stage is where you infuse your video with a distinct personality. This involves more than just applying a filter; it's about sculpting the light and color in every shot to create a cohesive visual narrative. Whether you're aiming for the popular teal-and-orange look of modern cinema or a unique, branded color palette, this is where that vision comes to life.
For teams using Aeon, maintaining brand consistency is simplified. Aeon can analyze your brand's style guide and suggest color palettes that align with your established visual identity. This helps ensure that every video, regardless of its specific content, feels like a cohesive part of your broader brand ecosystem, reinforcing brand recognition and trust.
Actionable Color Correction & Grading Tips
To achieve a professional and consistent look, approach color with both technical precision and creative flair:
- Correct First, Grade Later: Always start with technical corrections. Use scopes and waveform monitors in your editing software to fix white balance, exposure, and contrast issues. This creates a neutral, accurate baseline before you apply any creative styles.
- Use Reference Stills: Find reference images or stills from films that have the look you want to achieve. Use these as a guide to help you match colors and tones, ensuring your creative choices are intentional and directed.
- Create and Use LUTs: For projects with multiple videos or for maintaining brand consistency, create custom Look-Up Tables (LUTs). A LUT is a preset that can be applied to your footage to achieve a consistent color grade quickly across different clips and projects.
- Check on Multiple Devices: Color can appear differently on various screens. Before finalizing your export, test your video on a laptop, a high-quality monitor, and a mobile phone to ensure the colors translate well and don't appear distorted to your audience.
8. Export Settings & Distribution Optimization
The final step in your production journey is delivering the finished product to your audience. This is the export and distribution phase, where your meticulously edited video is encoded into a final file ready for upload. Think of it as the final packaging and shipping of your product; poor execution here can render all previous efforts useless. This stage involves selecting the correct codecs, containers, bitrates, and resolutions to ensure your video looks its best on every platform, from a 4K television to a mobile phone screen.
Platforms like YouTube and Vimeo have popularized the need for specific export settings, creating a gold standard for digital video delivery. Mastering these technical specifications is a non-negotiable part of any modern video production checklist. A properly optimized export ensures maximum quality, faster loading times, and compatibility across a vast range of devices, directly impacting viewer experience and engagement.
Streamlining the Final Delivery
The complexity of exporting for multiple platforms can be a significant bottleneck. Each destination, whether it's YouTube, Instagram Reels, or a corporate website, has its own unique set of "best practice" specifications. Getting this wrong can lead to pixelated video, audio sync issues, or outright rejection by the platform.
Aeon assists in this final, crucial step by simplifying the creation of derivatives. Once your main video is complete, the platform can help generate various versions tailored for different distribution channels. This means you can quickly create a high-resolution 16:9 version for YouTube, a vertical 9:16 highlight clip for social media, and a compressed version for email newsletters, all from the same core project, ensuring consistency and quality across the board.
Actionable Export & Distribution Tips
To ensure your video reaches its audience flawlessly, focus on these technical details:
- Create Export Presets: Save time and avoid errors by creating custom export presets in your editing software (like Adobe Media Encoder or DaVinci Resolve) for each platform you frequently use.
- Export a High-Quality Master: Always export a master file in a high-quality format (like ProRes 422 HQ). This "digital negative" is your archival version for future edits or re-exports.
- Test on Target Devices: Before a full rollout, watch your exported video on a phone, a tablet, and a computer monitor. This helps you catch any compression artifacts or color shifts that weren't visible in the editing suite.
- Include Accessibility Features: Make your content accessible to a wider audience by embedding closed captions (using an .SRT file) and providing a descriptive audio track if necessary. For more ideas on repurposing content, you can learn more about how to create video highlights that drive engagement.
Video Production Checklist Comparison
Supercharge Your Workflow: The Future of Video Production is Automated
Navigating the intricate landscape of video creation, from the initial spark of an idea to the final upload, can feel like an overwhelming endeavor. This comprehensive video production checklist has been designed to serve as your foundational guide, providing the essential structure to transform creative concepts into polished, professional-grade content. We've journeyed through every critical phase, from meticulous pre-production planning and scripting to the technical nuances of camera setups, audio design, and lighting. We also covered the artistic side of cinematography and the rigorous post-production tasks of editing, color grading, and optimizing for distribution.
Mastering each of these eight stages is the hallmark of a skilled production team. However, in today’s fast-paced digital environment, proficiency alone is no longer enough. The true competitive advantage lies in achieving both quality and scale simultaneously, a challenge that traditional workflows struggle to meet. This is where the paradigm shifts from manually ticking boxes to intelligently automating them.
From Checklist to Automated Engine
The core takeaway is this: a checklist provides the "what," but intelligent platforms provide the "how" at unprecedented speed and efficiency. Think about the most resource-intensive steps we discussed:
- Scripting and Storyboarding: Instead of hours spent brainstorming and writing, AI can generate structured scripts and shot lists based on simple inputs, instantly creating a roadmap for your narrative.
- Asset Sourcing: The hunt for the perfect B-roll, music track, or graphic can derail timelines. AI-driven systems like Aeon can analyze your script and automatically source and suggest brand-aligned, contextually relevant assets from vast libraries.
- Editing and Assembly: The painstaking process of cutting clips, layering audio, and adding graphics, which traditionally takes hours or days, can be condensed into minutes. AI handles the rough cuts, syncs audio, and applies branding, freeing your editors to focus on high-impact creative refinements.
By integrating the principles of this video production checklist into an automated workflow, you are not just making a marginal improvement; you are fundamentally re-engineering your content creation process. You move from a linear, labor-intensive model to a dynamic, efficient content engine.
Unlocking Scalability and Strategic Focus
For publishers, media companies, and marketing teams, the benefits are transformative. The ability to produce a high volume of quality videos without a proportional increase in headcount or budget is a game-changer. It allows you to experiment with new formats, personalize content for different audience segments, and react swiftly to market trends.
This efficiency also has a profound impact on team dynamics and project management. When repetitive, technical tasks are handled by AI, your creative professionals can dedicate their expertise to what matters most: storytelling, strategic direction, and innovation. Furthermore, managing the influx of new projects and client communications that comes with increased output becomes a new challenge. To keep operations smooth, many professional editors and production houses now rely on specialized CRM solutions tailored for video editors to streamline client management and project pipelines, ensuring the business side keeps pace with creative production.
Ultimately, this detailed video production checklist is more than just a list of tasks; it's a blueprint for excellence. By embracing the power of automation to execute this blueprint, you are not just preparing for the future of video production, you are actively building it. You are empowering your team to create more, innovate faster, and achieve a level of consistency and quality that sets you apart in a crowded digital world.
Ready to stop just checking the boxes and start automating your entire video workflow? Discover how Aeon leverages AI to execute your video production checklist in minutes, not days. Learn more about Aeon and revolutionize how your team creates content at scale.